 Save to Pinterest
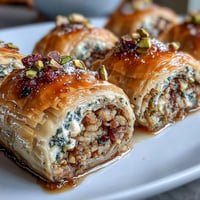
 The first time I encountered konafa was at a family gathering where my aunt arrived with a golden, shimmering dessert that seemed to catch the light from every angle. Everyone crowded around the moment it hit the table, and I watched as she cut into those crispy, delicate layers to reveal the treasured nut filling beneath. I decided right then that I needed to master this, and after some patient trial and error in my own kitchen, I finally understood why this Egyptian classic has endured for generations. It's not just a dessert; it's a moment of magic made with butter, nuts, and a touch of syrup that transforms the simplest ingredients into something unforgettable.
I made this for my neighbor once on a quiet afternoon, and she came over just as the honey syrup was cooling, filling the kitchen with this incredible aroma of roses and caramelized sugar. We sat on the porch eating warm pieces straight from the pan, and she asked for the recipe immediately, swearing it reminded her of a trip to Cairo she'd taken as a young woman. That's when I realized konafa isn't just Egyptian; it's a bridge between memories and people.
Ingredients
- Kataifi (shredded phyllo dough), 500 g: Make sure to thaw it completely before using, but keep it in a dry place so the strands don't clump together.
- Unsalted butter, 200 g melted: The butter is what creates that golden, crispy texture, so don't skimp on melting it thoroughly and brushing it evenly between layers.
- Walnuts, 150 g finely chopped: These provide an earthy richness that anchors all the other flavors in the filling.
- Pistachios, 100 g finely chopped: They add a subtle sweetness and a bit of color that makes the filling visually interesting.
- Almonds, 50 g finely chopped: These keep the filling from becoming too dense while adding a delicate texture.
- Granulated sugar, 60 g: This sweetens the filling without overpowering the natural nut flavors.
- Ground cinnamon, 1 tsp: Cinnamon is the soul of this filling, warming everything up with its familiar spice.
- Ground cardamom, 1/4 tsp: Just a whisper of cardamom adds sophistication and prevents the filling from tasting one-dimensional.
- Granulated sugar, 200 g for syrup: This forms the base of the syrup that will soak into the hot pastry.
- Water, 120 ml: This dissolves the sugar and creates the medium for the other syrup flavors.
- Honey, 2 tbsp: Honey adds depth and keeps the syrup from crystallizing too quickly.
- Lemon juice, 1 tsp: A small squeeze brightens the syrup and prevents it from tasting cloyingly sweet.
- Rose water or orange blossom water, 1 tsp (optional): This is the secret touch that makes people ask what the mysterious, floral note is.
Tired of Takeout? 🥡
Get 10 meals you can make faster than delivery arrives. Seriously.
One email. No spam. Unsubscribe anytime.
Instructions
- Set the stage with heat:
- Preheat your oven to 180°C (350°F) and grease your 23 cm baking pan with a little melted butter so nothing sticks. This small step makes cleanup easier later and ensures your base doesn't brown too quickly on the bottom.
- Gently separate the kataifi:
- Take the thawed kataifi and very carefully loosen the strands with your fingers, working slowly so you don't break them into tiny pieces. You want them to stay as long and intact as possible for that signature crispy texture.
- Build the base layer:
- Place half of your loosened kataifi strands into the pan, using your hands to press them down gently but firmly into an even layer that covers the bottom. Don't flatten them completely; you want them to hold their structure. Drizzle half of your melted butter evenly over this layer using a pastry brush.
- Mix the treasure:
- In a bowl, combine the chopped walnuts, pistachios, almonds, sugar, cinnamon, and cardamom, stirring until everything is well blended and the spices are distributed evenly. You should smell cinnamon and see little flecks of spice throughout.
- Fill with care:
- Spread the nut mixture evenly over your buttered kataifi base, making sure it's distributed all the way to the edges so every bite will have texture and flavor.
- Create the crown:
- Place the remaining kataifi strands over the nut filling, pressing them down very gently so they hold together but still maintain their delicate crispness. Drizzle with the remaining melted butter, brushing it in carefully so every part gets golden.
- Bake until golden:
- Place in the preheated oven for 30 to 35 minutes until the top is deep golden brown and you can hear a faint crackling sound when you move the pan. The edges will be darker than the center, and that's exactly what you want.
- Make the magic syrup:
- While the konafa bakes, combine the 200 g sugar and 120 ml water in a small saucepan over medium heat, stirring until the sugar dissolves completely. Let it bubble gently for 7 to 8 minutes, then remove from heat and stir in the honey, lemon juice, and floral water if you're using it. The syrup will smell incredible and should look clear and glossy.
- The most important moment:
- The second the konafa comes out of the oven, while it's still piping hot, pour the cooled syrup evenly over the entire surface. You'll hear it sizzle slightly, and this is when the syrup soaks into all those crispy layers, transforming them into something tender and completely irresistible.
- Rest and slice:
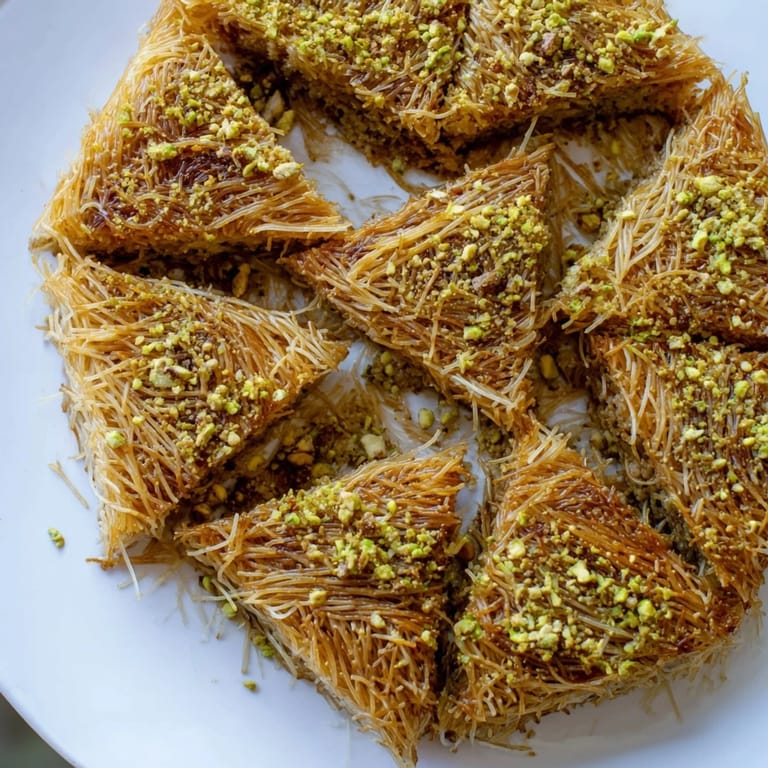
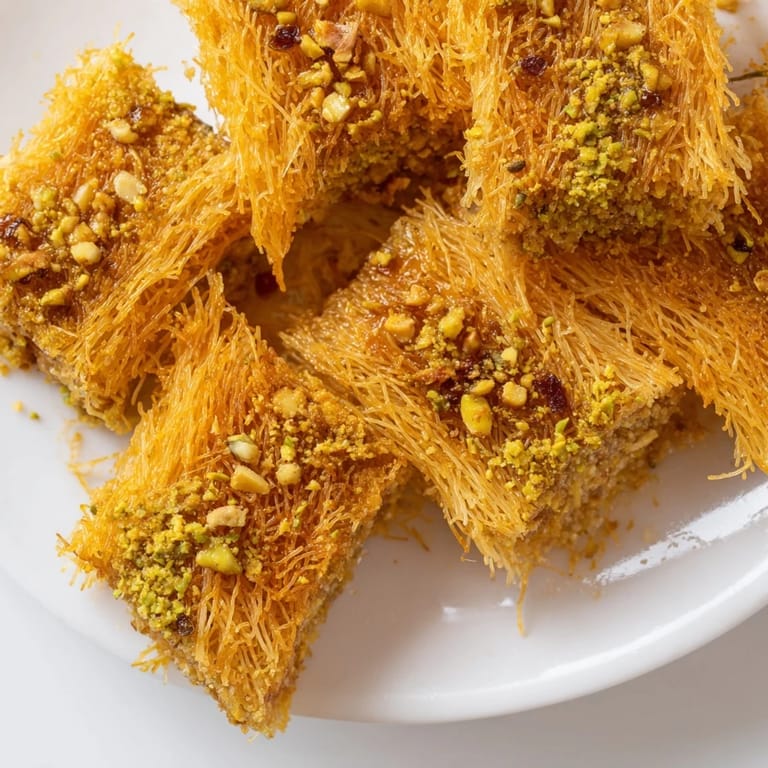
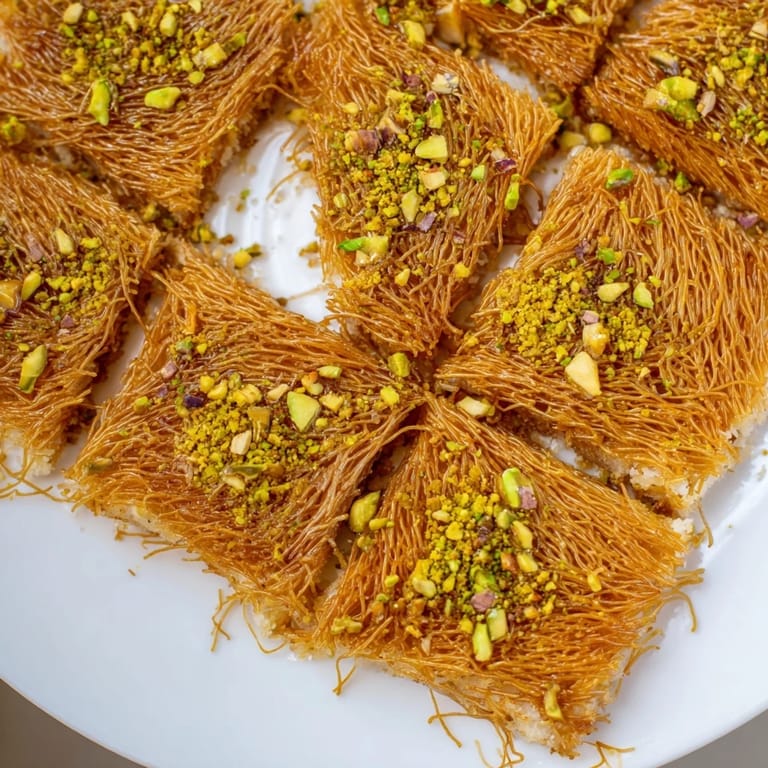
- Let the konafa cool for at least 30 minutes before cutting into it, though patience here means the pieces will stay together beautifully. Use a sharp knife and cut it into diamonds or squares, wiping the blade between cuts to keep things neat.
 Save to Pinterest
 There's a moment right when you pour that warm syrup over the hot pastry when you realize why people have been making this dessert for centuries. The sound, the smell, the way the whole kitchen seems to pause and take a breath—that's when konafa goes from being just food to being an experience. I think that's why everyone remembers it.
The Art of Nut Layering
I used to think that more nuts meant a better filling, but I learned that balance is what makes konafa shine. The ratio I've landed on—walnuts for earthiness, pistachios for subtle sweetness, and almonds for texture—creates a filling that's interesting without being heavy. If you want to play with it, keep the total weight around 300 g and respect the spice ratios, because that's what ties everything together.
Syrup Secrets
The syrup is where konafa becomes truly special, and I've discovered that the trick is in the timing and temperature. Make it earlier in the day if you like, but always let it cool slightly before pouring it over the hot pastry; this prevents the kataifi from becoming soggy while still allowing the syrup to soak into every layer. Some people swear by rose water, while others prefer orange blossom water, and honestly, you can skip it entirely if you're not sure—the honey and lemon are more than enough to make magic happen.
Beyond the Basics
One of my favorite discoveries was adding a thin layer of sweetened ricotta or clotted cream between the nut filling and the top layer of kataifi; it adds a creamy surprise that no one expects. You can also experiment with different nut combinations—hazelnuts, cashews, or pecans all work beautifully—and I've even added a tiny pinch of ground cloves once just to see what would happen, and it was remarkable. The beauty of this dessert is that it respects tradition while leaving room for your own kitchen experiments.
- Serve konafa at room temperature, never straight from the oven, so all those layers can be appreciated without burning your mouth.
- If you make it the day before, cover it loosely with foil and store it at room temperature; it will taste even better as the syrup continues to settle.
- Pair it with a strong cup of Turkish coffee or mint tea to balance the sweetness and complete the experience.
 Save to Pinterest
 Every time I make konafa now, I think about that moment at my aunt's table and how a simple dessert created a memory that stuck with me. I hope this becomes part of your kitchen story too, the kind of thing you make for people you care about and they never forget.
Recipe FAQs
- → What type of dough is used for Egyptian Konafa?
Kataifi, a shredded phyllo dough, is used to create the signature crisp layers in Konafa.
- → Which nuts are traditionally included in the filling?
Walnuts, pistachios, and almonds are finely chopped and combined with spices for the nutty filling.
- → How is the honey syrup prepared?
The syrup is made by boiling sugar and water, then adding honey, lemon juice, and optionally rose or orange blossom water for aroma.
- → Can the nut filling be customized?
Yes, nuts such as hazelnuts, cashews, or pecans can be used as alternatives to create varied flavors.
- → What baking tools are essential for making Konafa?
A 23 cm round baking pan, a small saucepan for syrup, mixing bowls, and a pastry brush are required for preparation.
- → How should Konafa be served?
Allow the pastry to cool after baking and syruping, then slice into shapes. Serving at room temperature enhances its texture.