 Save to Pinterest
 My neighbor knocked on my door last Fourth of July with a pan of these striped treats, and I couldn't stop eating them—something about the way the colors caught the light made them feel more special than regular Rice Krispies bars. The layers were so neat and intentional, like she'd planned a tiny flag out of marshmallows and cereal, and somehow that simple idea stuck with me. Now I make them every summer, and they've become the thing people actually ask for instead of the usual plate of cookies.
Last year I made these for a backyard potluck where nobody knew each other yet, and watching people's faces when they saw the red, white, and blue was unexpectedly moving—it felt like we were all buying into something together, even over just a dessert. By the end of the evening, the pan was completely empty and someone asked for the recipe, which somehow made the whole afternoon feel less awkward and more like a memory in the making.
Ingredients
- Rice Krispies cereal: Six cups is the exact amount to soak up all that melted marshmallow without turning into a brick—too little and you get goo, too much and it gets dense.
- Mini marshmallows: The 10-ounce bag divides perfectly into three portions, and mini ones melt faster and more evenly than the jumbo kind.
- Unsalted butter: Split into three tablespoons total, about one per layer, just enough to help everything slide together without pooling.
- Vanilla extract: Half a teaspoon goes into the white layer specifically, which sounds small but creates this subtle sweetness that makes people pause and ask what you did differently.
- Red and blue gel food coloring: Gel beats liquid every time because it won't thin out your mixture and turn the whole thing into a soggy mess.
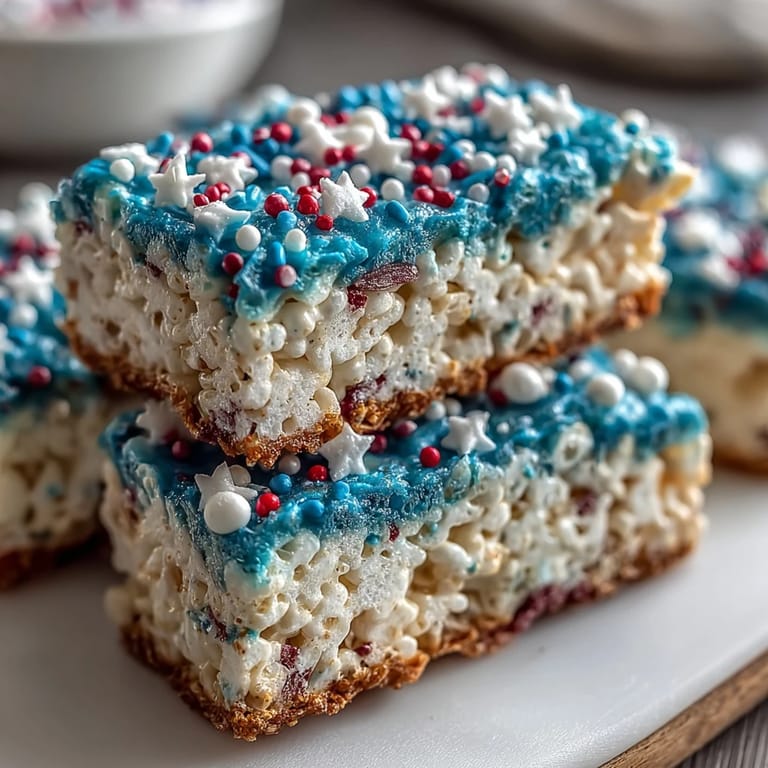
- Red, white, and blue sprinkles: Optional, but they catch the light and remind people this is a celebration, not just a snack.
Tired of Takeout? 🥡
Get 10 meals you can make faster than delivery arrives. Seriously.
One email. No spam. Unsubscribe anytime.
Instructions
- Prepare your pan like you mean it:
- Line your 9x9-inch pan with parchment paper and grease it lightly—this is the moment that determines whether your finished treat slides out smooth or tears apart in frustration. Leave the parchment hanging over two edges so you can grip it later.
- Divide everything into thirds:
- Before you start melting, portion out your marshmallows and butter into three piles on your counter—this prevents the scramble later when you're working with hot, sticky stuff. It also ensures each layer is actually equal.
- Make the red layer come alive:
- Melt one tablespoon of butter over low heat, add one-third of the marshmallows, and stir until you've got a glossy puddle. A few drops of red gel coloring goes in next—stir it until the color is uniform and bright, like a July sunset caught in a saucepan.
- Toast in the first layer of cereal:
- Pour two cups of Rice Krispies into your red marshmallow and fold it together gently but thoroughly, making sure every piece gets coated. This takes about thirty seconds and you'll know it's done when there are no white streaks left.
- Press and hold:
- Transfer the red mixture into your prepared pan and press it down firmly but not aggressively into an even layer. Lightly greasing your spatula or your fingertips prevents it from sticking, and pressing gently from the center outward helps you avoid bumps.
- Build the white layer with restraint:
- Wipe your saucepan clean, melt the second tablespoon of butter, add the second portion of marshmallows, and this time add half a teaspoon of vanilla extract after they're melted. The vanilla scent is your signal that something good is happening.
- Layer two goes down soft:
- Mix in two cups of Rice Krispies, then press this white layer over the red one with even gentler pressure—you're building something delicate here. Take your time and you'll see the layers stay distinct and beautiful.
- Finish with blue confidence:
- Repeat the saucepan process one last time with the final butter and marshmallows, add a few drops of blue gel coloring, and fold in the last two cups of cereal. This top layer should taste like victory and summer, which sounds silly but when you're done you'll understand.
- Crown it if you want:
- While the whole thing is still slightly warm, scatter your red, white, and blue sprinkles across the top if you're using them—they'll stick just enough to stay put. This step isn't necessary but it makes the treat feel intentional and finished.
- Let time do the work:
- Set the pan somewhere it won't be disturbed and let it cool and set for at least one hour, though two hours is better if you have the patience. Once it's firm, use the parchment to lift the whole block out, place it on a cutting board, and cut it into sixteen neat squares with a sharp, dry knife.
 Save to Pinterest
 My seven-year-old niece once took a bite and said these tasted like fireworks looked, which was so perfectly sincere that I've never forgotten it. That's when I realized these aren't just treats—they're a small ritual that makes people feel something, which is honestly everything a recipe should do.
Why Gel Coloring Changes Everything
The first time I made these I grabbed the liquid food coloring from my cabinet because I wasn't paying attention, and the mixture turned into something between a pudding and a paste—it wouldn't layer, it wouldn't set, and the whole pan became this blurry rainbow of regret. Gel coloring is concentrated and water-free, so it tints without diluting, and the difference is genuinely night and day.
The Science of Getting Layers Right
Each layer needs to be pressed down firmly enough that it holds its shape but gently enough that you don't compress it into a dense brick that changes the whole eating experience. The trick is using even pressure from the center outward, and if your hands stick, just dampen them slightly with cool water instead of using more grease.
Storage and Serving Suggestions
Once these are cut and fully cooled, they keep in an airtight container for up to three days, though I've never had any last that long because they disappear first. The chewy texture holds up beautifully and they travel well in picnic baskets, lunch boxes, or as a gift for someone who loves a little extra color in their life.
- Keep them in a sealed container with parchment between layers so they don't stick together.
- Bring them to room temperature before serving if you've kept them in the fridge, because cold makes the texture a bit tougher than it should be.
- Double the recipe if you're feeding a crowd—one pan is never enough once people taste them.
 Save to Pinterest
 These treats have become my favorite way to celebrate summer, and they're proof that the simplest ideas, executed with a little intention and color, stick with people long after the last bite. Make them, share them, and watch someone's face light up when they realize three layers actually happened in the same pan.
Recipe FAQs
- → How do I achieve bright layers in the treats?
Using gel food coloring provides intense hues without adding extra moisture, ensuring vibrant and clearly defined red, white, and blue layers.
- → Can I use salted butter instead of unsalted?
Yes, salted butter can add a subtle depth of flavor, but it may slightly alter the sweetness balance of the treats.
- → What is the best way to prevent sticking while layering?
Lightly greasing hands or a spatula before pressing each layer helps keep the mixture from sticking and ensures even layers.
- → How long should the treats cool before slicing?
Allow at least one hour for the layers to set firmly before slicing into squares to maintain their shape.
- → Can I add toppings to these layered squares?
Sprinkling red, white, and blue sprinkles on top while still warm adds a festive touch and extra texture.