 Save to Pinterest
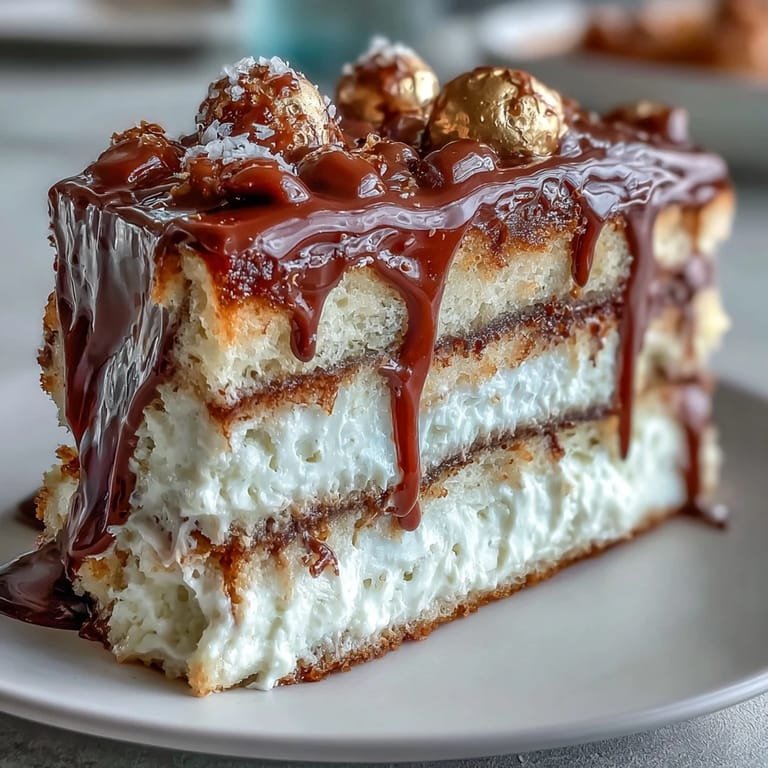
 The first time I baked this cake was for my cousin's graduation, and I remember standing in my kitchen at dawn, nervous energy buzzing through me like I had too much coffee. She'd always been the overachiever, the one who made everything look effortless, and I wanted her cake to feel just as special. When I pulled those three vanilla layers from the oven and the smell hit me—buttery, vanilla-sweet, almost perfume-like—I knew this was going to be something memorable. That morning taught me that celebration cakes aren't just about looking beautiful; they're about showing up for someone in a way that tastes like pride and joy mixed together.
I made this cake again for a promotion party at a friend's house, and watching guests' faces light up when they saw it on the table was its own kind of magic. Someone asked if I'd ordered it from a bakery, and honestly, that moment made all the careful leveling and dripping worth it. There's something about a cake that makes people feel celebrated—not just fed, but truly seen.
Ingredients
- All-purpose flour: Use a light hand when measuring; spoon and level instead of scooping straight from the bag, or you'll end up with a dense, heavy cake.
- Unsalted butter: Room temperature is non-negotiable here—cold butter won't cream properly and you'll lose that airy texture the sponge needs.
- Granulated sugar: The creaming process is where the magic happens; take your time beating butter and sugar together until it looks pale and fluffy, almost like frosting itself.
- Large eggs: Room temperature eggs blend seamlessly into the batter and create a more tender crumb.
- Pure vanilla extract: Go for real vanilla; the artificial stuff won't give you that subtle warmth that makes people wonder what your secret ingredient is.
- Whole milk: Room temperature milk helps the batter come together smoothly without shocking the warm butter mixture.
- Powdered sugar: Sift it before you use it, or you'll spend twenty minutes beating out lumps from your buttercream.
- White chocolate: Choose a good quality brand; cheaper white chocolate can taste waxy and won't melt as smoothly.
- Heavy cream: Essential for both the buttercream and the drip; it's what gives everything that luxurious, silky finish.
- White chocolate crispy pearls or malt balls: These become your edible gold balloons and add a textural surprise when you bite into the cake.
- Edible gold spray or luster powder: A tiny touch transforms simple pearls into something that feels genuinely celebratory.
Tired of Takeout? 🥡
Get 10 meals you can make faster than delivery arrives. Seriously.
One email. No spam. Unsubscribe anytime.
Instructions
- Set the stage:
- Preheat your oven to 350°F and get those three cake pans ready with parchment paper—this is non-negotiable if you want layers that pop right out without sticking. Greasing and lining takes five minutes and saves you from heartbreak.
- Mix your dry ingredients:
- Whisk flour, baking powder, and salt together in a medium bowl, making sure everything is evenly distributed. This step prevents dense pockets of flour in your finished cake.
- Cream the butter and sugar:
- Beat them together until the mixture is pale, fluffy, and almost mousse-like—about three minutes with an electric mixer on medium speed. This is where you're aerating the batter, so don't rush it.
- Incorporate eggs and vanilla:
- Add eggs one at a time, beating well after each addition so they fully incorporate before you add the next one. Then mix in vanilla extract until you catch that warm aroma.
- Alternate wet and dry:
- With the mixer on low speed, add a third of the flour mixture, then half the milk, then another third of flour, then the remaining milk, finishing with the last of the flour. This prevents overmixing and keeps your cake tender.
- Divide and bake:
- Pour batter evenly into your three pans and smooth the tops with an offset spatula. Bake for 30 to 35 minutes, until a toothpick inserted in the center comes out clean or with just a few moist crumbs.
- Cool with patience:
- Let cakes rest in their pans for 10 minutes before turning them out onto wire racks to cool completely. Rushing this step can cause them to crack or break apart.
- Make the buttercream:
- Beat room-temperature butter until smooth, then gradually add sifted powdered sugar, mixing well to avoid lumps. Pour in cooled melted white chocolate, vanilla, salt, and two tablespoons of heavy cream, then beat until light and fluffy, adding more cream if it feels too stiff.
- Level and layer:
- Once cakes are completely cool, trim the tops flat if they've domed, then place the first layer on your serving plate. Spread with buttercream, add the next layer, spread again, and top with the third layer.
- Apply the crumb coat:
- Spread a thin, almost translucent layer of buttercream all over the cake to seal in crumbs, then chill for 30 minutes. This step is what separates a rustic cake from a polished one.
- Final frosting:
- Apply a thick, generous final coat of buttercream, smoothing the sides with a warm offset spatula and creating a flat or slightly domed top. Step back and admire your work.
- Create the drip:
- Heat heavy cream until it just barely simmers, then pour it over chopped white chocolate and let it sit for one minute before stirring until silky smooth. Cool to room temperature so it flows beautifully without being too warm.
- Execute the drip:
- Using a spoon or squeeze bottle, let the white chocolate ganache cascade down the sides of the cake from the top edge, allowing gravity to do the work. Fill the center with extra ganache and smooth it gently with a spatula.
- Prepare the gold balloons:
- Spray your crispy pearls or malt balls with edible gold spray (follow the can's instructions for a light, even coat) or roll them in luster powder mixed with a tiny bit of vodka or clear alcohol so it adheres. Let them dry completely before inserting toothpicks or thin cake wires into each one.
- Crown the cake:
- Arrange your gold balloon decorations on top of the cake in a festive cluster, positioning them where they'll catch the light and draw everyone's eye. Chill until serving time, then bring to room temperature for the best flavor and texture.
 Save to Pinterest
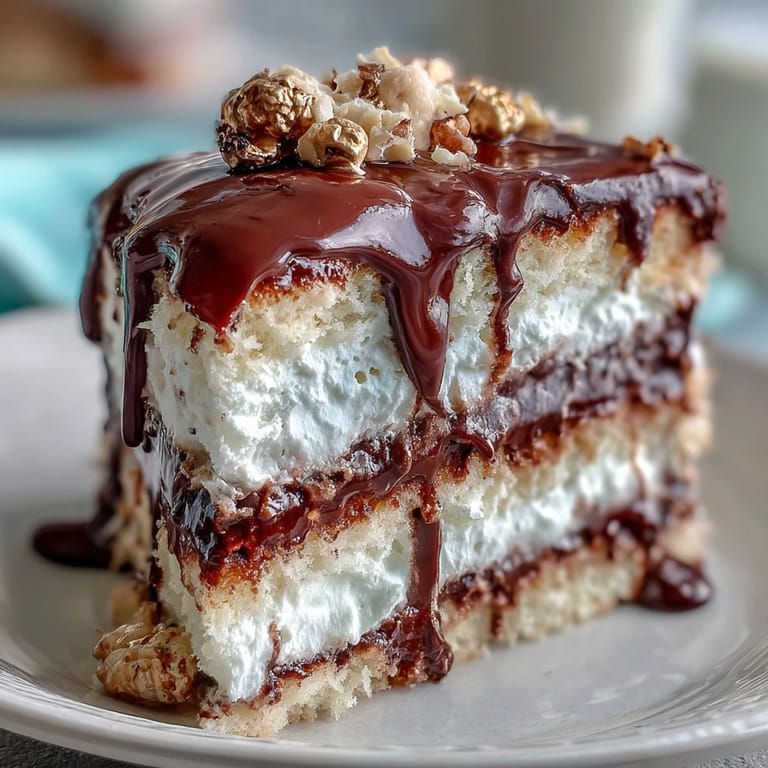
 What I love most about this cake is how it brings people together in anticipation—everyone gathers around when you bring it out, phones come out for photos, and there's this moment of collective appreciation before anyone takes a slice. It transformed from just being a cake into a memory, which is exactly what milestone moments deserve.
Vanilla Sponge Perfection
The secret to this sponge's tender crumb is actually in the technique, not any fancy ingredient. Creaming butter and sugar properly creates tiny air pockets that expand during baking, giving you that pillowy texture. I learned this the hard way when I tried to speed up the creaming process once and ended up with a cake that was dense and disappointing. Now I set a timer and give it the full three minutes, listening for the mixer to change its sound as the mixture transforms from grainy to fluffy.
White Chocolate Buttercream Mastery
White chocolate buttercream can feel temperamental if you don't understand what it wants—which is basically respect for temperature. If your kitchen is warm, your buttercream might get too soft and you'll need to chill it between applications. I keep an offset spatula in a glass of ice water during assembly, dipping it frequently so I can smooth the buttercream without it breaking down under the warmth of my hands. It sounds like extra work, but the difference in finish is so worth it.
Decoration Secrets and Timing
The gold balloons are where this cake shifts from beautiful to genuinely show-stopping, and the secret is in how you treat those crispy pearls. Don't spray them too close to the cake—do it outside or over a paper towel, or you'll end up with gold mist all over your frosting. Let them dry for at least 15 minutes before inserting the toothpicks, or the spray won't be set properly and you'll get gold dust on your fingers.
- Assemble the balloon decorations just a few hours before serving so they stay pristine and the toothpicks don't become unstable.
- If you're nervous about the drip, practice on a test plate with a similar angle and texture first.
- Store leftovers covered in the refrigerator and bring the whole cake to room temperature before serving for the best flavor and texture.
 Save to Pinterest
 This cake has become my go-to for anyone celebrating something big, because it says "I took time for you" in every carefully crafted layer. Bake it with confidence and watch how it becomes the centerpiece of someone's special memory.